
Planning for “that day”
How to plan
Preparing a built property for wildfire is a multi-part process. Experts say that modern homes in the Very High Fire Hazard Severity Zone space burn too easily, as they are too vulnerable to ember ignition. The ember chain mechanism is responsible for 60-80% of home ignitions. This means that the first priority in preparing for wildfire is ember mitigation, that is, making a home less susceptible to ignition by embers. The second is developing a detailed plan that identifies fuel chains that allow fire to approach the structure from the property line and beyond, and outlining methods for effectively breaking those chains. Third is a plan for home hardening, which can involve substantial upgrades to the structure’s exterior.
For homes located immediately adjacent to the WUI, and perhaps a few blocks in, proper defense will require commitment to home hardening in the near term. For homes some distance from the WUI, the immediate threat is from embers, and it may make sense to emphasize ember mitigation over home hardening. Often home hardening techniques can be built into necessary and desirable upgrades to a home’s exterior.
Concurrent with property preparation is personal preparation, developing a plan for final preparations on Red Flag days that evolves post ignition into an evacuation procedure or shelter in place.
Understanding ember mitigation and property preparation requires an introduction to the topic that includes both, which is creating defensible space
Creating defensible space
Defensible space has two general definitions, which depend on the viewpoint/context of the speaker. It can mean creating substantial breaks in the vegetation chains that could allow a fire to approach a structure. It could also mean creating space on a property where firefighters can safely operate and suppress a fire.
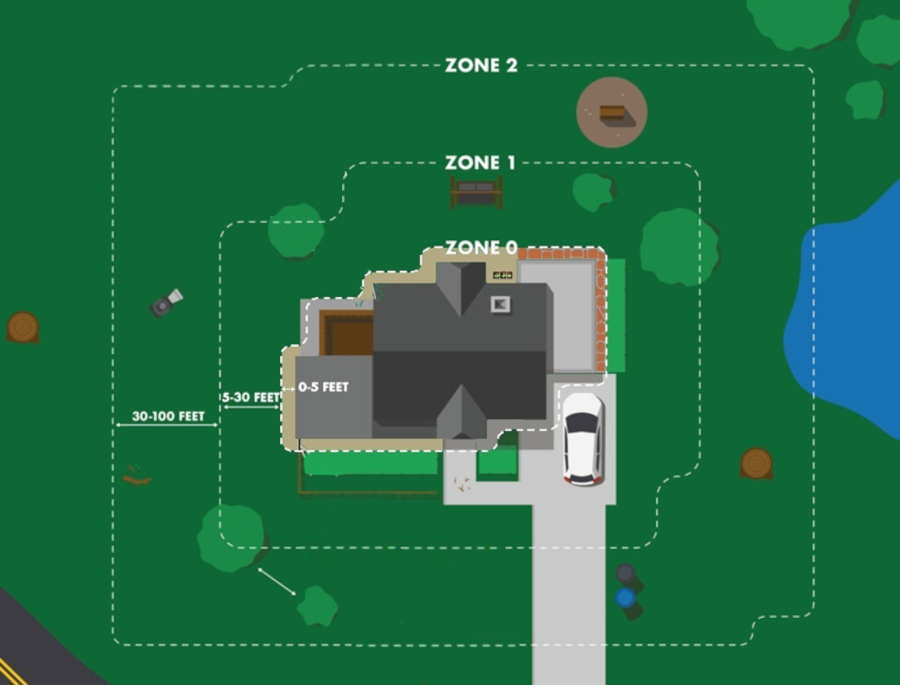
California requirements for maintaining defensible space can reach out to 100 feet from the structure in more rural areas. In Mira Mesa, most of the concern centers on Zone 0 (0-5’ from structure) and Zone 1 (5-30’ from structure). Ember mitigation is typically confined to Zone 0 and vent upgrades.
Ember Mitigation
Ember mitigation solves the problem described above; like most other homes in Southern California, Mira Mesa homes can be ignited too easily by embers. There are proven methods for changing or eliminating the circumstances under which embers can ignite a home.
What are Zone 0 requirements?
Zone 0 is the band of space from 0-5’ around a structure/residence. Zone 0 will be the main area of focus for most Mira Mesa homeowners in the near term. Because 60-80% of wildfire ignitions are caused by embers, the objective is to remove flammable material in Zone 0 to deny embers the kindling they need to ignite a home’s eaves.
The first step involves a frank assessment of a home and its vulnerabilities within that home’s Zone 0 space. Combustibles include anything that burns readily, such as stacked firewood, boxes of newsprint, dried bushes near the foundation and chipped mulch. The goal is to remove all of it, as any vulnerability can ignite.
The next step is to prioritize activities. Some tasks will be simple to accomplish, and should be addressed first. A combustible that had some future value is a liability if it can facilitate a fire, and as such it should be disposed of properly. Chipped mulch and dried brush can be disposed of in greens recycling (the Green Can), as can unpainted lumber with no fasteners.
The plan does not have to be a complex document, it is enough to list tasks in order of priority, and for each task when it should be started (allowing for lead time and seasonal influence), what tools and materials are required to complete, and what information must be gathered, leaving room for notes.
Rock mulch is the preferred replacement for wood chipped mulch. This doesn’t mean wide swaths of drab gravel. Bagged rock is available from home improvement centers in many sizes, colors and styles, tips for creating rock gardens and dry streams are readily available online. It is best to plan the garden in advance, measure the space to be covered against the coverage of the proposed rock, and buy accordingly. There are many resources available online were techniques for creating in rock are detailed. Best results are usually obtained by picking a main techniques, then blend others sparingly in different locations to take advantage of the uniqueness of that space. Write down and sketch out the plan.
Sheds, playhouses and other auxiliary buildings can be a special problem. The planning phase is a good time to do some cleaning out, and assessing how much storage is really needed for outdoor items that are used regularly. A shed may have to be moved or replaced outright by a non-combustible (metal) shed.
When building the plan, don’t miss anything. Experts who surveyed the aftermath of recent large urban fires often remarked that fire “seemed to seek out vulnerabilities”. The plan should ensure that nothing is overlooked, or left until later and later is too late.
The City of San Diego Fire & Rescue Department has published a localized version of Zone 0 requirements which should be consulted when there are questions about what will eventually be enforced. Access them here.
The City of San Diego has published regulations for Zone 0 that are different from the guidance provided by the State of California (CALFIRE). San Diego resident should follow the guidance provided by San Diego as the Local Responsible Authority for our city.
What are Zone 1 requirements?
Zone 1 should be included in ember mitigation because the embers that ignite a house often originate in Zone 1 trees and shrubs. The requirements are centered around removing dead grass and shrubs/trees, then trimming and maintaining the remaining foliage. The strategy comes in when a healthy tree/shrub is marked for removal because doing so creates a clean break in the foliage, interrupting the fuel chain into the side of a home. After that it is an exercise to remove excess biomass as much as possible. A reduction in biomass means fewer embers if those plants burn. There are specific rules for maintaining distance between trees and shrubs, all of them having to do with flame length in one way or another.
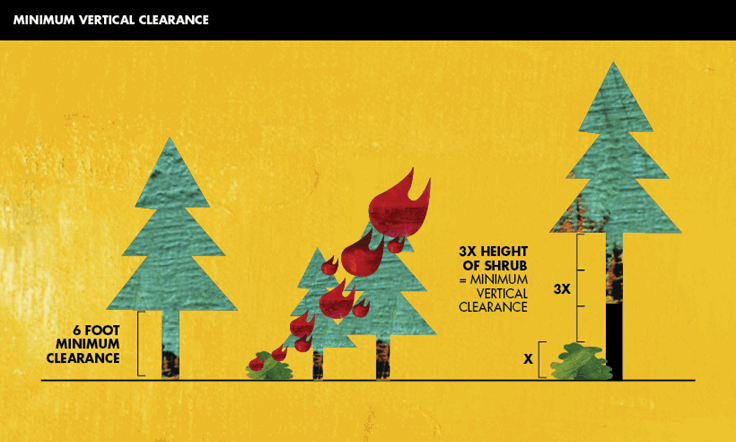
Vertical Spacing Rules
- Trim trees so that the lowest branch is 6 feet from the ground
- When shrubs are growing under a tree, the lowest tree branch should be 3 times the height of the shrub
- A shrub growing near a tree should be separated from the tree by 3x the height of the shrub
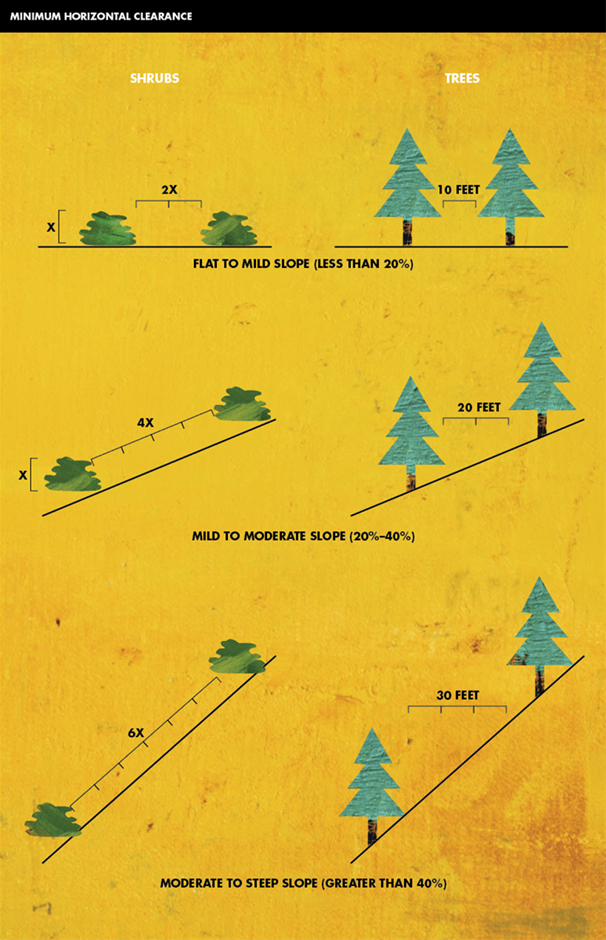
Horizontal spacing rules
- Trees should be 10 feet apart
- Shrubs should be separated by a distance 2x their height
- The steeper the slope, the greater the separation distance
These rules all take into consideration potential flame length in high wind environments.
Note: If a major branch lost will result in tree loss, exceptions can usually be made. Because the end goal is to avoid laddering fire, a tree with low branches should not have shrubs under it to compensate.
What is flame length?
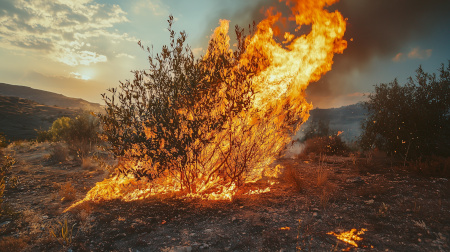
Flame length is just that, the length of the fire from it’s base to it’s tip. It is a function of wind speed and the density/heat energy of the fuel that is burning. On slopes, the flame can be further elongated, especially as wind tends to move up slopes at higher speeds. Zone 1 (and to some extent Zone 0) strategy is based on expected flame length. Because wind speed changes constantly it is a major variable.
What are the three kinds of heat?
In addition to heat from embers, there are two other forms of heat in the wildfire environment, direct flame and radiant heat. Direct flame heat describes flames hitting a fuel directly, radiant heat describes thermal energy in the form of heat hitting a fuel. These terms are important for our next discussion about vents
Vents
Embers are able to penetrate through the ¼” hardware cloth that most of our homes have covering the vents. Vents are necessary to keep air free-flowing in the attic, or the shingles can literally bake off. Homes that have been retrofitted with a Class A roof have a venting system, whereby vents installed in the mid-to lower roof let air in, which is then exhausted through a ridgeline vent. The existing vents are typically left in place. They are of three types, gable, eave/soffit, and garage. In some areas with basements or crawl spaces, foundation vents are also used.
What are intumescent vents?
While this section is primarily about ember mitigation, it is important to note that house vents are available from several manufacturers as intumescent vents. Under extreme heat, such as radiant heat or flames from an adjacent on fire neighbor’s home, shed or tree, a special material in the vent will melt and seal the vent entirely. These are available for all three vent types in a variety of sizes.
Intumescent vents can be an upgrade option over simply screening the vents with finer mesh than ¼”. Screening with 1/8″ or less mesh is ember mitigation. Intumescent vents are a component of home hardening.
Note: re-screening or replacing with intumescent vents can have an impact on the Net Free Area for an attic, because more material is being added to the available venting space of each vent. There are many websites that describe Net Free Area and the requirements for it, as well as methods for calculating Net Free Area. Installation professionals are typically aware of the requirements and will make appropriate adjustments. Typically a Class A roof with a vented ridge and installed O’Hagin vents will substantially improve Net Free Area.
Moving forward
With planning completed, it’s time to start a project.